Gingerbread Snow Globe Cookies
These cookies are soft gingerbread that takes minutes to cook. Grab some cutters and make these cookies for gifts or the Christmas table. Don't spend a fortune this year. Make it personal with this lovely cookie idea
Ingredients
Honey Gingerbread
- 150 gm honey 5.30 oz
- 100 gm caster sugar 3.50oz
- 1½ tsp cinnamon
- 1 ½ tsp ginger, ground
- 1/2 tsp cloves. ground
- 1/4 tsp salt
- 2 tsp baking soda
- 130 gm soft butter, chopped 4.60 oz
- 1 whole egg 55gm/ 1.94 oz
- 420 gm flour, plain 3 cups (aust) / 14.8 oz
Royal Icng
- 1 packet Royal icing mix
- Green colour paste
- blue colour paste
- Sprinks sprinkles
- Cookie boxes, if you like
- 4 small Piping bags
Instructions
To make the gingerbread
- Set the oven to 170C (340F). Combine the flour and salt and set aside
- Put the honey, caster sugar and spices into a pot. Melt the ingredients together and stir occasionally until the contents simmer. Simmer until it bubbles and then add the bi carbonate of soda. Take off the heat. Stir. The honey will thicken and bubble up.
- Stir in the butter a bit at a time. The mixture will deflate. Cool down enough to mix in the egg. (If you can put the tip of your finger into the mixture and hold it there for a few seconds and it only just feels warm, you will be able to add the egg) Whisk the egg in to the mixture in the pot. Pour the butter mixture into the flour, salt mix and stir until the mixture forms a dough. ( by hand or machine)
- Spread out a piece of baking paper on the benchtop and pour on the dough. Cover with another piece of baking paper and roll out to about 1 cm thick (1/4inch) You can use a little flour to dust if the mixture is sticky to roll out but it isn't usually. Use a cutter to cut shapes then a pallet knife to slip under and lift the cut pieces and put them on a tray lined with baking paper. If the shapes are hard to remove due to stretching and sticking, put the rolled out dough onto a tray (paper and all) and chill for a few minutes to make it easier to loosen the cut pieces without stretching and misshaping them
- Bake the biscuits for approximately 8 minutes or until slightly puffed and just starting to colour. Set aside to cool.
Royal Icing
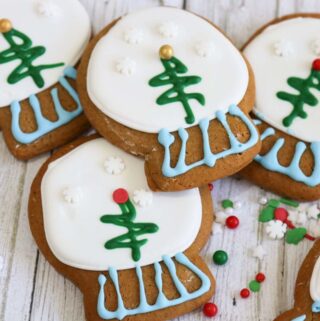
- Follow the packet instructions. Whip the royal icing until thick and fluffy. Separate the icing into 4 bowls. (or more if you want to make more colours. I like to keep it simple). I start with a smaller amount for the thickest outline colour, then the most icing for the white filling. I then set aside a small amount for blue and another small amount for green. Cover all the bowls with cling wrap
- The thickest outline colour will need to be thinned enough to be piped. Add just a small amount of water a few drops and stir well. (1/4 teaspoon at a time at most). Put the outline colour into a piping bag and snip a tiny amount from the tip. You will not need any piping tubes. Start with a small hole. Test by piping a line on a test paper to make sure it comes out of the tip well. If needed cut a little extra from the tip. The colour should squeeze out a bit like toothpaste (only a very thin line). Once all the outlines are drawn on the cookies, prepare the flood icing
- Add drops of water bit by bit to the next bowl of white icing until it resembles thickened cream. Always add water very slowly. Put this icing into another piping bag and cut a small hole. Test how quickly the icing flows out of the bag, then when happy start to fill the cookies. Sit for a couple of minutes before adding sprinkles or anything else you like to represent the snow of the snow globe. Let the white base dry. ( approx 20 minutes)
- Continue with the blue, making lines that look like base the snow globe would sit on. You will not need to add too much water as the colour will take the place of some of that water you would add if thinning. The green and the blue colours do not need to be as thin as the filling (flood) whiteNow finish with the green colour adding colour first to thin a little and add water if needed. Practice drawing the Christmas tree on the paper before beginning. Keep the design simple. Only pipe onto the dried white base.
- Add extra coloured balls and sprinkles if desired
Notes
Add water a bit at a time testing the consistency as you go. Icing sugar absorbs water quickly and gets surprisingly runny fast.
Too much water and the sugar icing will run out of the bag and not dry properly and too thick it will be difficult to squeeze out.
All is not lost, you can correct any mistakes by adding a bit of extra pure icing sugar if you need to.